Monday, January 14, 2013

Crockpot Chicken Taco Chili

The twins had their first basketball practice tonight, which I would not miss. Tonight was a good night to use the crockpot. Its also very cold outside, so I decided we needed soup of some type. I came across this yummy Crockpot Chicken Taco Chili recipe.

Here is the original pin I pinned:

The recipe comes from Skinnytaste blog.

Crock Pot Chicken Taco Chili
 Gina's Weight Watcher Recipes
Servings: 10 Size: 1 1/4 cups Old Points: 3 pts Points+: 5 pts
Calories: 203.7 • Fat: 1.4 gCarb: 33.3 g • Fiber: 10.0 g  Protein: 16.9 g

Ingredients:

  • 1 onion, chopped
  • 1 16-oz can black beans
  • 1 16-oz can kidney beans
  • 1 8-oz can tomato sauce
  • 10 oz package frozen corn kernels
  • 2 14.5-oz cans diced tomatoes w/chilies
  • 1 packet taco seasoning
  • 1 tbsp cumin
  • 1 tbsp chili powder
  • 24 oz (3-4) boneless skinless chicken breasts
  • chili peppers, chopped (optional)
  • 1/4 cup chopped fresh cilantro
Directions:
Combine beans, onion, chili peppers, corn, tomato sauce, cumin, chili powder and taco seasoning in a slow cooker. Place chicken on top and cover. Cook on low for 10 hours or on high for 6 hours. Half hour before serving, remove chicken and shred. Return chicken to slow cooker and stir in. Top with fresh cilantro. Also try it with low fat cheese and sour cream (extra points). 


My final product:


I changed the recipe up a little bit to fit my families taste. I substituted onion power for onion, substituted navy beans for kidney beans, omitted the 2 cans tomatoes with chiles, and omitted the cilantro.

I served this with all the taco toppings plus corn chips. There was enough of the meal left over to make another full meal for us.

This was a very tasty dish. It will definitely be making it into our meal rotation.


Pin It Now!

Tuesday, January 1, 2013

Transferring Ink To Candles

I love doing crafts, especially when someone asks my opinion on doing them. My dear friend Jenny asked me to experiment on a craft for her today.

Here is the original pin I pinned:


The tutorial comes from: A Girl In Paradise

This pin was a very fun and quick activity for me.

Here is how this project turned out:

First of all, I got all my supplies together: 
  • Computer paper
  • 1 sheet Tissue Paper
  • Tape
  • Sharpie or marker
  • Candles
  • Wax Paper
  • Hair Dryer (she used heat gun in tutorial but I do not have one so Hair dryer worked just as good)

Next, I found an image on Google that I liked. I chose a heart since it is almost time for Valentines Decor. 

 To print, you will first need to tape tissue paper to a piece of regular computer paper. I used regular Scotch wrapping tape.


After you print your image on the tissue paper it should look something like I have pictured.


I then cut out the tissue paper image while it was still taped to regular computer paper. For some reason it seemed easier this way than just cutting the tissue paper alone.


 Next, I got the image centered on candle and covered with a similar size wax paper. I taped wax paper the whole way around candle because it seemed easier than trying to hold wax paper in place.


After that, I put hair dryer against candle/wax paper and turned on. I left on each area of candle/image for about 20 seconds. 


Here is the second way I tried using this technique. I used tissue paper, sharpie marker, and stencil. Please excuse my Sharpie being pink and black. It seems that my daughter got a hold of it against my will and used it.  I really do not like it when she touches my Sharpies. That is another story for another day.


 Here is the third and final technique I tried. It is Google Image printed on tissue paper + Sharpie Marker. It looks kinda cute if you ask me. C is for Chris, my husband, and the M is for Mary. 


Didn't they turn out neat? 
I will definitely be doing this project over and over again.


My review:


Pin It Now!

Tuesday, September 18, 2012

DIY Modge Podge Fall Ball Jar

I love doing crafts. One type of craft I love is Mod Podge. But, as you may know, Mod Podge can get pretty expensive if you are using a lot of it. I was so happy when I saw this pin about making my own Mod Podge using just Elmer's Glue and water. It was just back to school stock up time so I have plenty of Elmer's Glue to find a use for.

Here is the original pin I pinned:


The tutorial comes from: Do It Yourself Divas

This pin was a very fun activity for me and my twins to complete together. And yes they sure did get Elmer's Glue everywhere, which is okay since it is washable.

Here is how this project turned out:

These will make a cute accent piece anywhere in the house.

My review:

Pin It Now!

Monday, September 17, 2012

DIY Fall Wreath

I was looking for a unique fall wreath. I love felt projects and have a wonderful collection, so when I stumbled upon this pin, I knew I had to try it.

Here is the original pin I pinned:
 
The tutorial comes from: Little Things bring Smiles.

I will not lie, this pin takes hours to complete.  It will take all week if you are working on it at night but it is so worth it. I was so proud when I completed my wreath.
 
Here is how my wreath turned out:

It turned out pretty well I think.

Now on to the good part, the review!!


Pin It Now!

Tuesday, August 7, 2012

DIY Modge Podge Tray

Don't you just love feeling accomplished?  I know I do.  This project is very fun, easy, and takes very little time to complete. And you will feel accomplished.

Here is the original picture I pinned:


The tutorial comes from: Maggie Rose Interiors.

She used fabric on her trays.  I decided to use scrap paper. 

I started with a tray I had gotten from a family member. They were going to throw this away.


  • I added some regular latex paint. I get all my paint at Lowes from their clearance rack. They usually mark paint 75%-90% off at the store here for mistinted paint. 
  • I waited 24 hours for paint to dry.
  • I cut my scrap paper to fit the tray.
  • I then modge podged paper to tray. I used 3 coats of modge podge.
  • After modge podge dried, I sprayed with Miniwax Polycrylic.


Here is the before and after.

I think it turned out very well.


Pin It Now!

Saturday, July 28, 2012

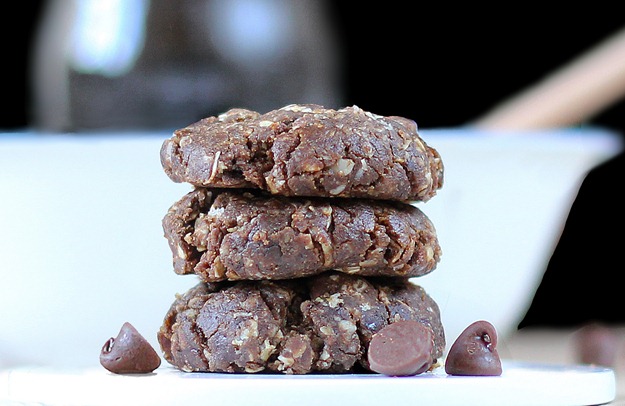
Pinterest Review: Mocha Chocolate Chip Cookies

Who says clean eating is boring? NOT I.  I love trying new clean eating recipes!!  I pinned a neat one last week. It went straight to my To Do list. I have been eying it ever since because it just looks so yummy.

Here is the original picture I pinned:


Those cookies look yummy don't they. I thought so. 

This recipe comes from one of my favorite all time blogs:

If you have never been to her blog, you should. She is amazing.

Katie wrote on her blog that these cookies will make you forget what time it is, what day it is, and basically everything else that was once important in your life.

She is not lying when she was describing these cookies.

Instead of using sugar or xylitol, I substituted 1/4 cup locally grown honey.  


Don't they just look delicious?


 You should make these. Really you should.  You will not be sorry.


Pin It Now!

Pinterest Review: Chalkboard Spray Paint Frame

A while back, I purchased some chalkboard spray paint at Michael's.  Which meant, time to look for a small project to do to test out this chalkboard spray paint.

Here is the original picture I pinned:


They look so neat don't they?

This tutorial comes from:
31 Insanely Easy and Clever DIY Projects
The before pictures of my frames:


after the chalkboard spray paint:
 

Finished product:


I will definitely be making more of these because it was so easy and looks very nice.


Pin It Now!